

February 7, 2013
by Mimi Holtz
5 Comments

Easy Marinated Pork Roast…Seville Oranges, Oregano, Cumin and Garlic!

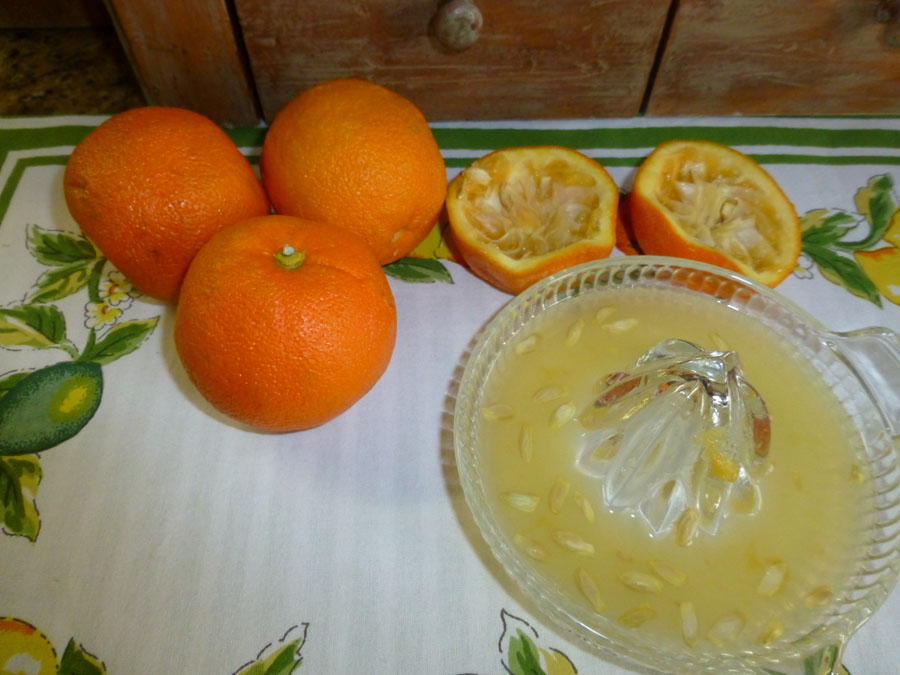
seville oranges

I wish I could capture the delicious aroma in my kitchen and share it with you!  Roast pork always smells so delicious…but this one had been marinating for a whole day before cooking.  I may never cook pork roast any other way again!

SevilleOranges from Melissa's Produce

Last week I was given these Seville oranges from Melissa’s Produce.  I had never heard of Seville oranges, so I did a little research.  There are stories to be found about these oranges!  They are not sweet at all,  in fact they’re downright sour.  And they’re full of seeds too.  Imagine having a tree of these gorgeous oranges, thinking they’re sweet, only to find out they aren’t edible! The skin is thick and rough,  the flesh is bitter.  What good could they be? Marmalade!  Infused liquors!  Cocktails!  Mojo Pork!

I decided on a simple and quick recipe for a marinade used in Puerto Rico.  I juiced the oranges but didn’t have the 2 cups of juice that I needed for the marinade,  so I added the juice of a huge navel orange.  Poured the juice into a huge zip-lock bag and added a teaspoon of oregano and half a teaspoon of cumin.  Then I put 2 tablespoons of minced garlic into the bag and squished everything together.   Added 1/2 tsp salt and a tsp of ground back pepper.   Then I put a small pork shoulder roast into the bag and sealed the zip-lock.  For the next 24 hours, that roast bathed in the marinade, as I turned the bag several times to make sure all the meat came in contact with the marinade.

zip-lock bag used to marinate pork roast

The next day  I set the oven to 450 degrees,  pulled the roast out of the marinade,  put it on a roasting rack and …into the oven it went!  After 10 minutes I lowered the heat to 250 degrees and that was it.   Hours later (about 4)  the meat thermometer finally registered 160 degrees.   By then everyone who came into the house knew that something wonderful was going to be ready for dinner.

roast pork

I let the roast “rest” for about 10 minutes after it came out of the oven and then sliced into the delicious meat.   Honestly, this is delicious!  I asked The Farmer how he liked the meat…answer:  “I can’t stop eating it!”

marinated pork shoulder

 We had a delicious dinner…roasted fingerling potatoes,  steamed green beans…and that scrumptious pork.

porkdinner


February 1, 2013
by Mimi Holtz
0 comments

Easy 13 Bean Soup with Vegetables and Smoked Pork, Topped with Avocado

13-Bean-Soup-Vegetables-Smoked-Pork

This heart bean soup filled with healthy vegetables is even more delicious topped with Fuerte avocado!

I thought I would make chicken soup today, but when I checked the freezer we had no chicken. Instead, I found 2 smoked pork chops from Mahogany Smokehouse in Bishop..   So I decided to make bean soup instead.  The artisan smoked  pork chops would flavor a pot of bean soup perfectly!  The pork chops were vacuum-packed and frozen, so I put the package into a deep bowl of cool water to thaw.

I had a package of Bob’s Red Mill 13 Bean Soup in the pantry, so I rinsed the beans, covered them with water and let them soak. The directions on the package said to soak them overnight, but I was trying to get this soup ready in time for supper.   So I drained the beans after 2 hours, and added fresh water to the pot so that the beans were covered and there was an extra inch of water on top.  After the beans and water came to a boil, I lowered the flame and let them simmer for about an hour.

Meanwhile, I  chopped up  a brown onion,  several stalks of celery, and five carrots.  I found a few leaves of kale and a bunch of fresh spinach in the refrigerator (remember that amazing meat sauce I made last week with kale and spinach?), so I chopped those up too and added them to the mix.  I sauteed them all together in 2 Tbsp. of olive oil.   Those veggies were so pretty that it was fun to stir them and watch the colors become even brighter.

Veggies-For-Soup

The colors of the veggies become brighter as they first begin to cook in the olive oil.


The smoked pork chops had thawed out, so I cut them up into 1/2 inch cubes and added them to the skillet with the vegetables.  After the beans had finished cooking and  were tender,  I added the contents of the skillet to the bean pot, along with 2 tablespoons of minced garlic and 2 teaspoons of  dried thyme leaves.   Now all I had to do was wait for the soup to simmer and the flavors to blend!

Beans with Veggies and Smoked Pork

Isn’t this soup pretty?

The pork chops were salty enough that I didn’t need to add any salt.  I did season it with a little black pepper.  The best part was added slices of  creamy Fuerte avocado to the top of the soup!   The Fuertes are in season during the winter months (January through March) but you probably won’t find them in stores.  You can order from California Avocados Direct and get them directly from our farm!  Beautifully  ripe fresh avocado is the perfect topping to the smoky bean soup.  All those vegetables made the soup extra-healthy…a perfect one-pot meal.

More-Avocado-Please

I like lots of avocado on top of the soup! The creamy cool avocado is delicious with the hot and smoky beans and vegetables.

January 23, 2013
by Mimi Holtz
5 Comments

Mimi Avocado’s Secret Sauce: Italian Meat Sauce with Kale, Spinach, Celery and Carrots

slice of lasagna

Last week I made this fabulous lasagna.  I have made lasagna many times, but this time I tried a new thing … I decided to add kale, spinach, celery and carrots to the sauce!  I have never wanted to eat kale.  For one thing, I remember seeing it growing in the fields and asking my father about it.  He told me it’s fodder for cattle and sheep.  So when I started reading about kale salads,  kale smoothies, and  “EatMoreKale.com” I just ignored it.

A couple of weeks ago the Los Angeles Food Bloggers group had an event called “Kale-Palooza”.  Everyone brought a kale recipe.  They even had kale margaritas! I looked at the information about Kale in the Whole Foods website.  Hmm…it has lots of health benefits.  I started thinking about what I might have done with kale if I had gone to Kale-Palooza.   So I decided to try making Italian meat sauce for lasagna but I would fill it with healthy greens…and I would see if anyone could guess my secret ingredients!


Meat Sauce

Here is the finished sauce…would you guess that it’s full of kale, spinach, celery and carrots?!

I started by browning  a pound of  mild Italian sausage and  a pound of ground beef in a skillet with one chopped onion and drained off the fat.  Meanwhile,   I put a cup of water into the Vitamix   and started to add fresh vegetables :  several large curly kale leaves,  a handful of  spinach leaves,  2 stalks of  chopped celery and 2 tablespoons of minced fresh garlic.  The leafy greens processed easier with the chunks of celery in the Vitamix.  Be sure to cut the celery into small chunks so the strings don’t wrap around the blade in the bottom of the mixing container!

kale, spinach, celery in the Vitamix

Kale, spinach, celery…ready for the sauce!

I pureed all of the veggies …it came out VERY green and really did smell like cattle fodder.  Never mind,  it would be healthy and I was on a mission to find a way to eat kale and like it!

I added the puree to the ground meat in a large skillet…along with  tomato puree,  some good  tomato sauce (no preservatives!), 2 grated carrots,   and several “glugs” of red wine (1/3-1/2 cup).    How to choose the wine?  I looked for a California red wine with a screw-top that wasn’t very expensive and had a cute bottle.  red wine for sauce

This “Sugar Pie” red wine was only $5.99 at Trader Joe’s…tasted great by itself (yes, I had to taste it!) and was perfect for the sauce!

greens in the sauce

When the greens were first added to the meat and tomato sauce, they looks very green!

Instead of using dried herbs,  I remembered the wonderful Gourmet Garden herbs in my freezer…so I added some Gourmet Garden Italian Herbs to the sauce.

Gourmet Garden herbs

I love having an herb garden in my freezer!

I let the sauce simmer for about an hour… and the green color went away!  Then I used the sauce to make my lasagna.

I decided to try Anthony’s  “Oven-Ready” lasagna noodles that don’t need to be boiled, so I just followed the instructions on the back of the box.

lasagan recipe

The “oven-ready” noodles worked perfectly and saved me some time!  The sauce was some of the best I have ever made.   In fact, I will probably add vegetables to my Italian meat  sauce all the time now.

lasagna with kale and spinach

My son said he would never know there was kale, spinach, carrots and celery in this lasagna if I didn’t tell him!

I hope you’ll try adding pureed kale and spinach to your sauce.  And wine.   It was absolutely delicious!   This recipe makes enough to have some left over … pass a bowl of sauce to put on top of the baked lasagna!  Or serve the sauce on some delicious rolls for healthy Sloppy Joe’s!

sauce wih kale

So much great nutrition and fiber in this sauce … and you’d never know you were eating kale!

January 15, 2013
by Mimi Holtz
2 Comments

Homemade Bean Soup with Smoked Turkey…and Avocado!

Bean Soup with Smoked Turkey

We have had such cold weather in Southern California lately!  The temperatures have been in the 20’s at night in our area,  cold enough to severely damage our avocado trees and the precious crop that is almost ready to harvest.     There isn’t much we can do to prevent the damage…it’s all up to Mother Nature.    The best way to take our minds off the weather is to chop veggies and make pots of delicious soup.

soak the beans

Use a 13 bean mix and soak the beans for at least 4 hours. I usually soak them over night.

The beans are colorful…soaking in the water highlights all the colors and shapes!   I use 1 part beans to 3 parts water,  and let them soak overnight.   In the morning I drain the beans and add fresh water to the beans….so that there are 2-3 inches of water covering the beans.   Bring the beans and water to a boil,  then lower the heat and let them simmer until the beans are tender… an hour or so.

soup veggies

I love chopping onions, carrots and celery for soup!  The colors are so pretty!   Saute them in a little olive oil,  add some minced garlic and some thyme.   When the beans have cooked until they’re tender,  add the vegetables to the soup.   I usually add a bay leaf too.

smoked turkey

When I make bean soup I usually add a ham hock or a smoked pork chop…or even smoked sausage.   (Check out my Mixed Bean Soup with Smoked Chicken Sausage!)    A  very special treat is smoked turkey.   Every year we are the happy recipients of a Greenberg smoked turkey from Texas…a holiday gift from my very special cousin.    Now that our boys have moved into places of their own,  we don’t eat up the huge turkey as fast as we used to.  This year I had some left over  to make this delicious soup!

bean soup with smoked turkey

Add chopped smoked turkey to the beans and veggies…let it simmer!

I make soup in the morning so it will be ready to eat by lunchtime.   When the family comes in from the cold,  they can smell the soup cooking!    Soup is even  better on the second day, as those delicious flavors mingle over time.   And for a really special treat,  add some sliced avocado on top!   This is the season for the “green skin” avocados in California….try some fabulous Fuerte avocados  on top of your soup!

Fuerte avocado

Fuerte avocados are pear-shaped, thin-skinned and full of flavor!  In season December through February.

January 4, 2013
by Mimi Holtz
1 Comment

The Best Dessert Ever for the Holidays: Chocolate Peppermint Cheesecake Squares

Chocolate Peppermint Cheesecake Squares

I’m not kidding.   Everyone loved these Chocolate Peppermint Cheese Cake Squares!   They’re so rich that one serving is only about 1 inch square.  Each morsel is full of rich chocolate flavor…and the mint makes it extra special!   No one feels bad about the calories because each piece is tiny…and after a big meal,  who needs more than that?

I must give credit where credit is due.  Sometime during December I saw a Facebook post that caught my eye, and resolved to make the recipe.   Before you read any further,  run right over to  Liv Life and read her post about Chocolate Peppermint Cheesecake Bars.   It was her photo and recipe that caused me to become obsessed with the idea of these tiny bites of fudgy perfection.

Of course, I never make a recipe exactly the way it’s written.  Sigh.  There’s usually some reason.  Either I don’t have the ingredients exactly as called for in the recipe,  or I decide to just try something different.   In this case,  I used different cookies for the crust and decided not to add the glaze.  Otherwise, the recipes are very much the same.    So here’s the recipe for the Chocolate Peppermint Cheese Cake Squares that I made,   inspired by Kim at Liv Life and adapted from her recipe.

Chocolate Peppermint Cheesecake Squares

These ultra-rich chocolate morsels are a perfect dessert or a heavenly treat with coffee...small but satisfying.
Prep Time30 minutes
Cook Time30 minutes
Total Time1 hour
Course: Dessert
Servings: 20 +
Author: Mimi Holtz, adapted from Kim Kelly of Liv Life

Ingredients

  • Crust:
  • 1 package of 30 Oreo cookies with green mint-flavored filling
  • 5 Tbsp. melted unsalted butter
  • Cheesecake:
  • 8 oz. unsweetened chocolate chopped
  • 8 oz. semisweet chocolate chopped
  • 16 oz. softened cream cheese okay to use lower fat
  • 1 1/3 cups granulated sugar
  • 1 cup sour cream okay to use low fat
  • 4 large eggs at room temperature
  • Topping:
  • Whipped cream I used the kind in a can
  • crushed candy canes I use the mini's

Instructions

  • Preheat oven to 350 degrees.
  • Place the cookies in a food processor and process until they are crumbs. The creme filling may cause the crumbs to clump together. While the processor is still running, drizzle the melted butter into the crumbs and process until they are combined. Press the mixture evenly into a foil-lined 9" x 13" pan.
  • Melt the chopped chocolate together in a double boiler, stirring occasionally until all the pieces are melted and smooth. When it's completely smooth, remove the bowl from the heat and let the chocolate cool at room temperature.
  • Place the cream cheese and sugar in a large bowl and beat until smooth. Add the sour cream to the mixture, mixing and scraping down the sides of the bowl. Add the eggs, one at a time and stir into the mixture. Pour in the melted chocolate and mix until the batter is smooth.
  • Pour the batter over the crust to cover evenly. Bake 25-30 minutes. Remove from oven and cool. Refrigerate the cake for at least 8 hours.
  • To serve, cut a long strip of the cheese cake, remove from pan and then slice into 1 inch squares. Top with a little whipped cream and add some crushed candy cane bits to the top.
  • This cheesecake will last for a week or two in the refrigerator if you wrap it well.

These decadent squares of fudgy deliciousness would have disappeared in a hurry if I hadn’t added the dreaded “Do Not Eat” note to the pan!

Chocolate Cheese Cake

This delicious cheese cake would have disappeared in a hurry if I hadn’t put a “Do Not Eat” post-it on!

Thankfully I was able to serve them for Christmas Day,  again a few days later when we had guests for dinner,  and they even lasted until New Year’s!   This one batch kept nicely in the refrigerator…and I think the flavor became even richer!

Chocolate cheese cake squares

These cheesecake squares taste like peppermint fudge!

I will definitely add this recipe to my annual “Best Holiday Desserts” list!  Thanks again to Kim at Liv Life for this fabulous idea!